Prinzip Pull-Printing
Sie senden Scans und Druckaufträge an den QPilot-Server, auf dem sie 5 Tage bereit gehalten werden.
Druckaufträge können während dieser Zeit an allen angeschlossenen Kopiergeräten (s. u.) abgeholt werden.
Danach werden sie automatisch gelöscht.
Zum Drucken und Scannen benötigen Sie Ihren Studierendenausweis mit Guthaben.
Zum Kopieren benötigen Sie ein Mindestguthaben von 0,60 €.
Preisliste Drucken und Kopieren
Format | einseitig oder duplex | farbig oder schwarz/weiß | Preis in € |
|---|---|---|---|
DinA4 | einseitig | sw | 0,05 |
DinA4 | duplex je Seite | sw | 0,05 |
DinA4 | einseitig | farbig | 0,30 |
DinA4 | duplex je Seite | farbig | 0,30 |
DinA3 | einseitig | sw | 0,10 |
DinA3 | duplex je Seite | sw | 0,10 |
DinA3 | einseitig | farbig | 0,60 |
DinA3 | duplex je Seite | farbig | 0,60 |
Tabelle 1 QPilot Preisliste Drucken
Zur Guthabenerstattung wenden Sie sich bitte an den Infopoint (Studierendenwerk) in der Mensa.
Scannen ist gratis. Jedoch muss auf Ihrem Studierendenausweis trotzdem ein Guthaben von mindestens 0,60 € vorhanden sein.
Standorte der Kopiergeräte
Raum | Kopiererbezeichnung | Kartenleser ID | |
|---|---|---|---|
1 | 4-010 | 101 | 1 |
2 | 1-008 | 102 | 3 |
3 | 1-008 | 103 | 2 |
4 | 2-021 | 201 | 9 |
5 | Bau 2 Bibliothek EG | 211 | 5 |
6 | 3-124 | 311 | 11 |
7 | 3-324 | 332 | 12 |
8 | Bau 5 0.87 | 501 | 6 |
9 | Bau 8 242 | 10 | |
10 | LS 154.1A | LS 1 | 4 |
Tabelle 2 QPilot Standort Kopierer
Druckjobs in den PC-Pools versenden
Studierende der HFT können von den Rechnern in den Computerräumen Druckaufträge an die Kopiergeräte über den QPilot-Server senden und diese innerhalb von 5 Tagen an den Kopiergeräten abrufen.
Dazu benötigen Sie Guthaben auf Ihrem Studierendenausweis. Lehrenden sowie Mitarbeitern und Mitarbeiterinnen steht diese Funktion nicht zur Verfügung.
Druckerauswahl:
Für schwarz/weiß Ausdrucke wählen Sie den Drucker QPilot_sw an qpilot01.ad.hft-stuttgart.de aus.
Für farbige Ausdrucke wählen Sie den Drucker QPilot_farbe an qpilot01.ad.hft-stuttgart.de aus.
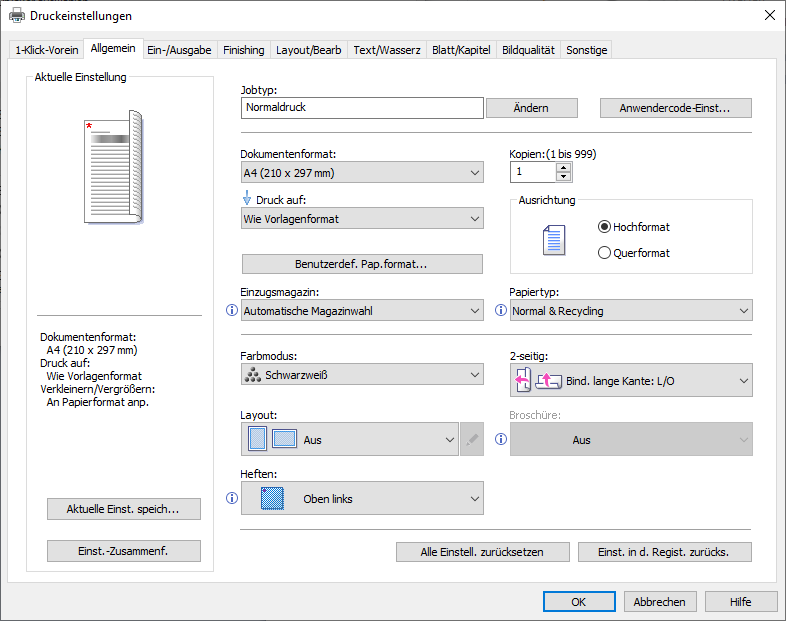
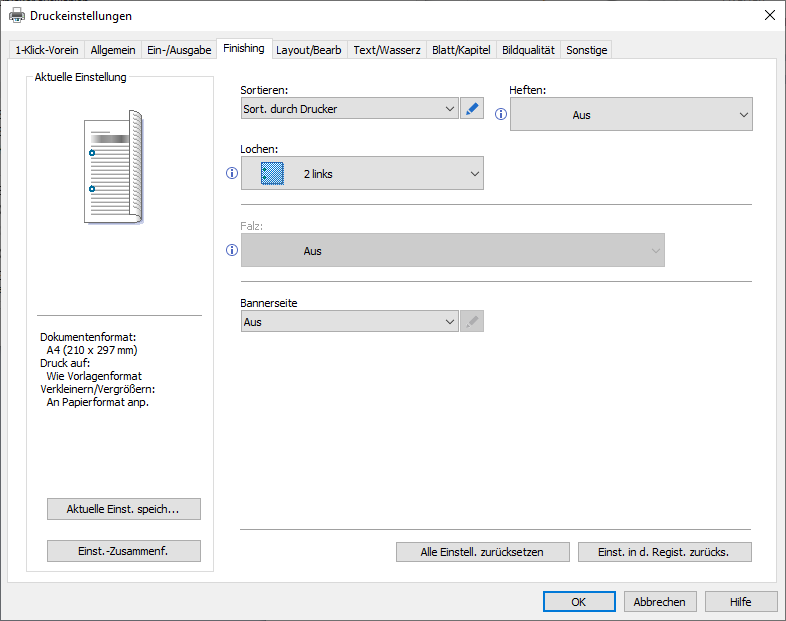
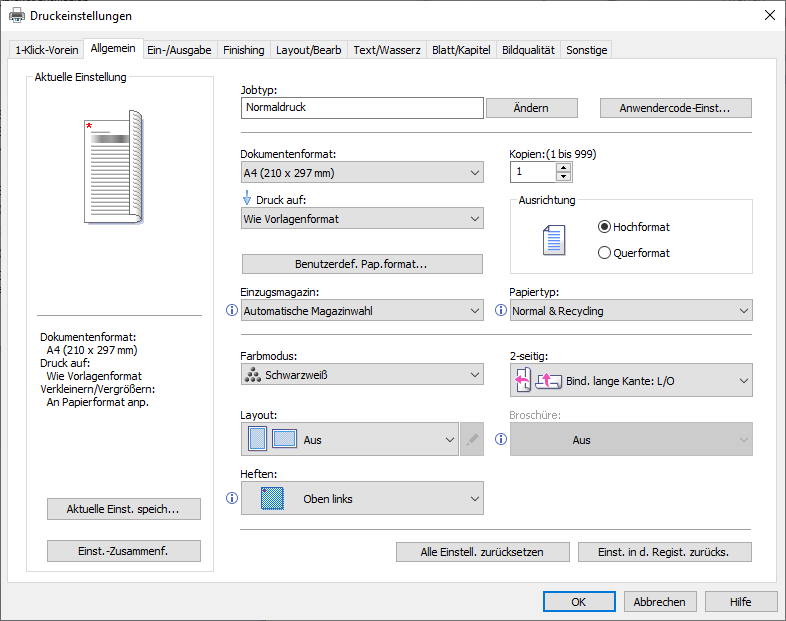
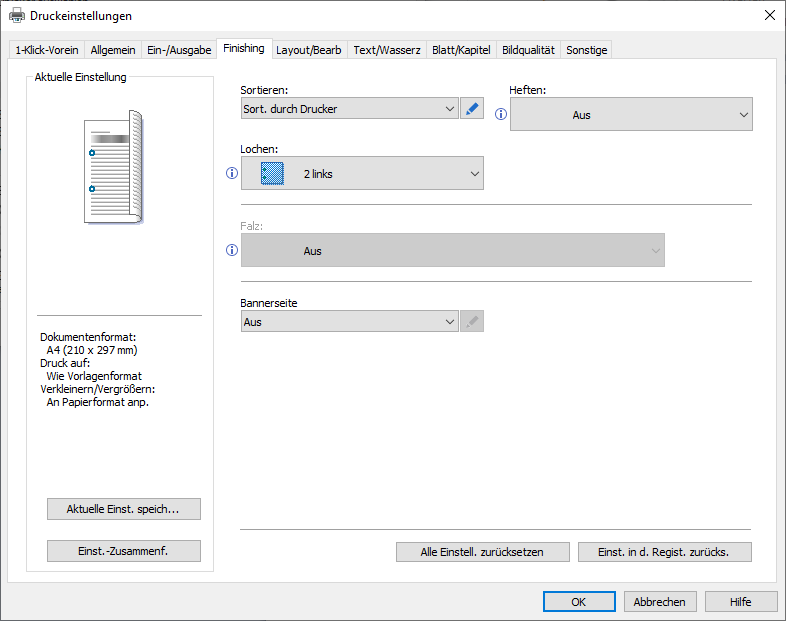
Nehmen Sie zusätzlich unter Einstellungen (Druckeinstellungen) in der Registerkarte „Allgemein" die Einstellungen vor, wie Ihr Dokument am Ende ausgedruckt werden soll (z. B. Layout: 2 Seiten pro Blatt, 2-seitig, heften). Sie können auch bis zu 5 Blätter heftklammerlos heften (Schräg ob. lin. heftkl.los, Schräg ob. re. heftkl.los), da eine Konfiguration am Touchscreen des Kopiergerätes später nicht möglich ist. Die Position einer möglichen Lochung definieren Sie unter der Registerkarte „Finishing".
Abbildung 1 Druckeinstellungen_1
Abbildung 2 Druckeinstellungen_2
Scannen
Scan-to-Email
Vorgehensweise:
1. Scanvorlage auf das Vorlagenglas oder in den Mehrfacheinzug legen
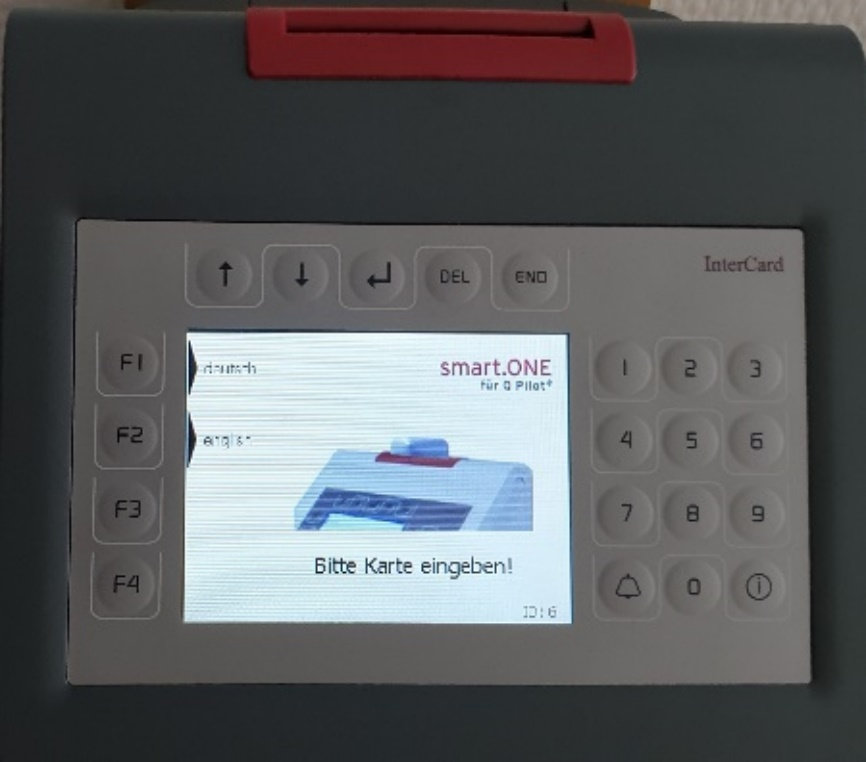
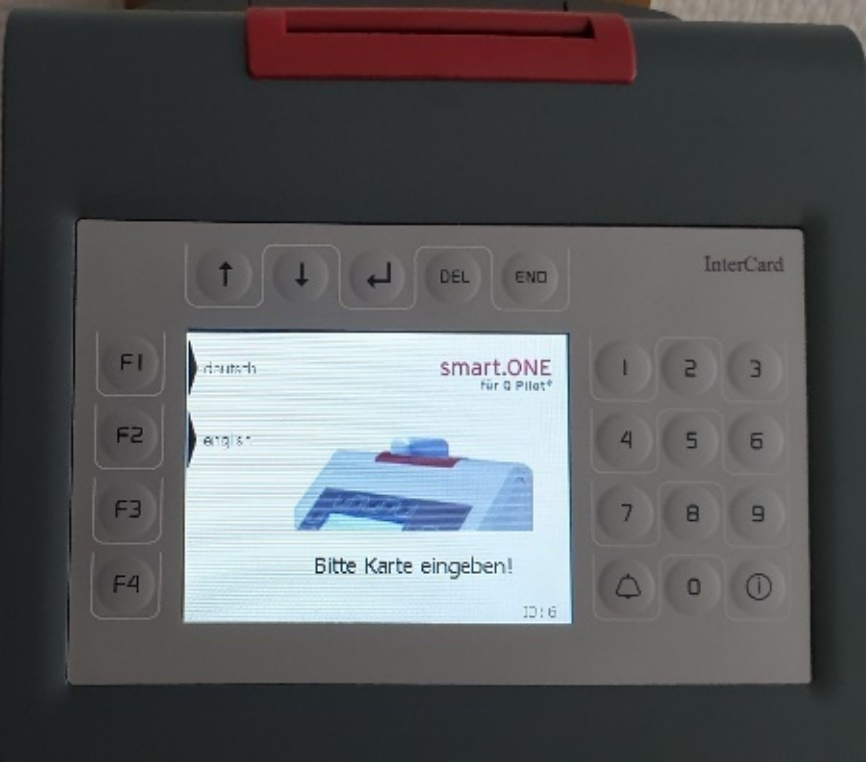
2. Hochschulausweis (mit Guthaben) in den Terminal einführen
Abbildung 3 Terminal Home
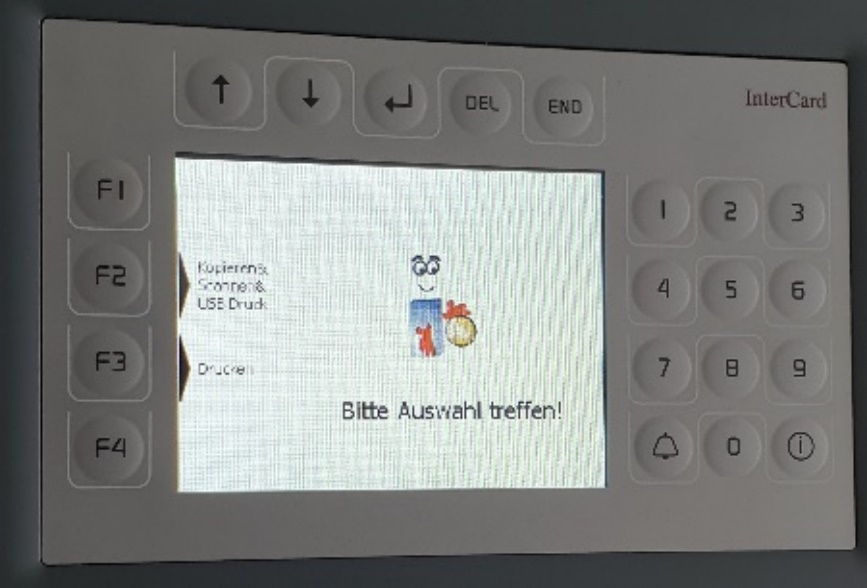
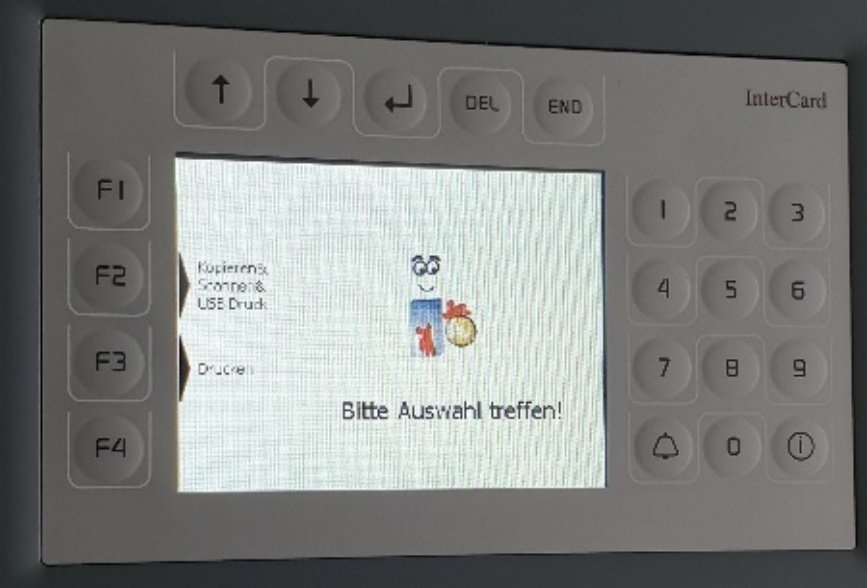
3. F2: Kopieren& Scannen& USB Druck wählen
Abbildung 4 Terminal Auswahl_Kopieren_Scan_Druck
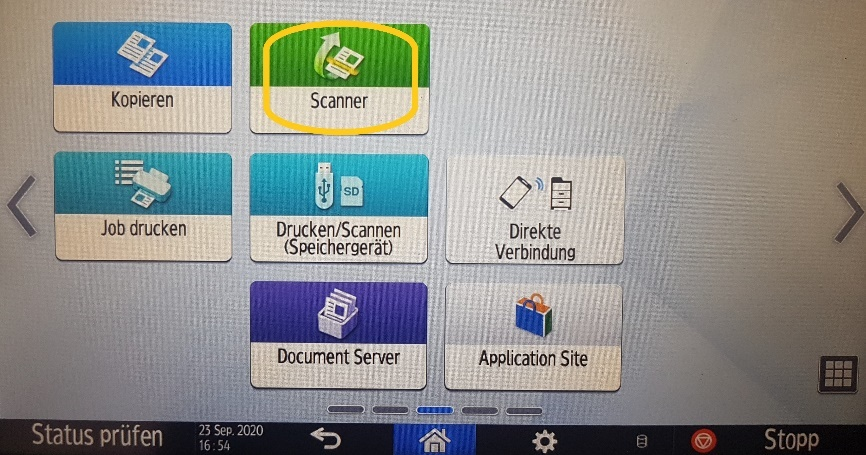
4. Am Touchscreen des Kopierers auf „Scanner" klicken
Abbildung 5 Touchscreen Home
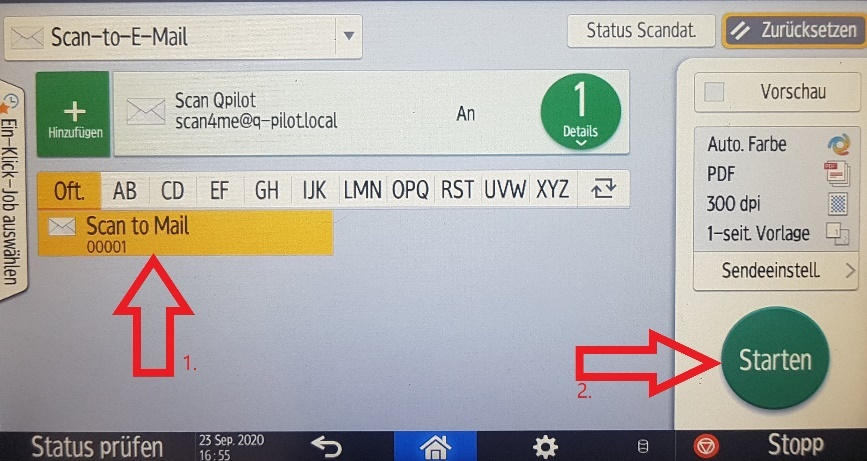
5. „Scan to Mail" wählen und "Starten" klicken
Abbildung 6 Touchscreen Scan_2_Mail_1
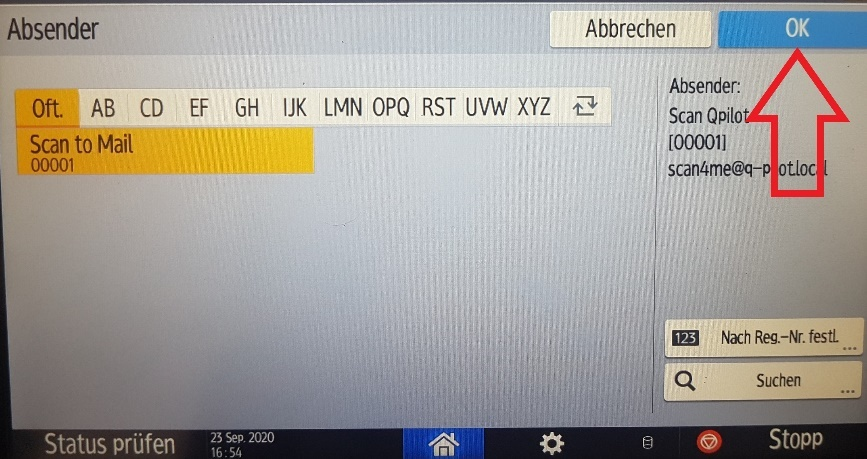
6. Nochmals „Scan to Mail" klicken und mit „OK" bestätigen
Abbildung 7 Touchscreen Scan_2_Mail_2
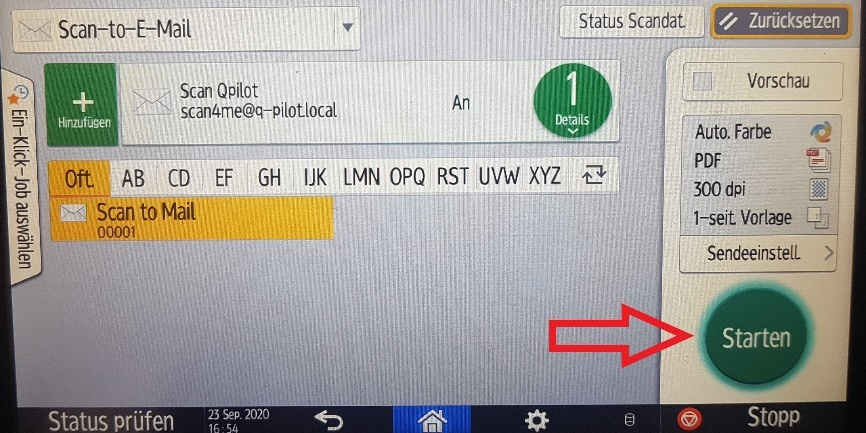
7. „Starten" klicken
(Unter „Sendeeinstell." Hat man noch die Möglichkeit verschiedene Scanoptionen zu wählen)
Abbildung 8 Touchscreen Scan_2_Mail_3
8. Der Scan wird jetzt durchgeführt und per E-Mail versendet.
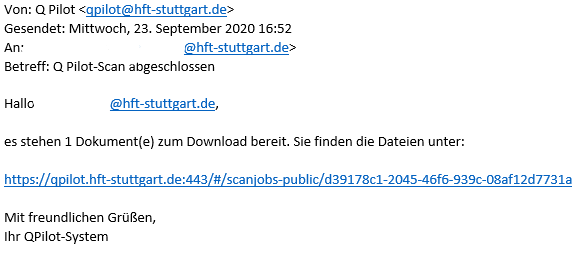
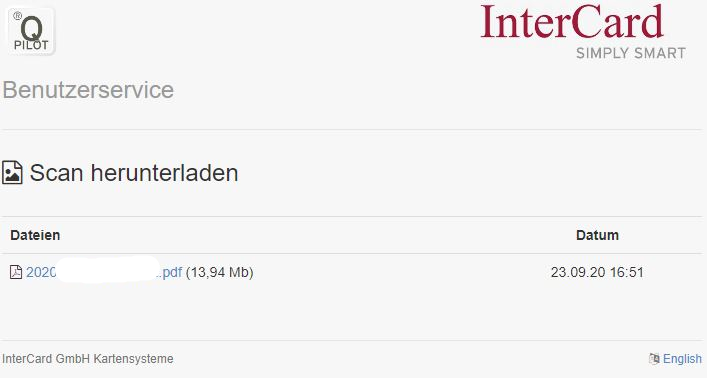
Sollte der Scan größer als 10 MB sein, enthält die Mail einen Download-Link, sonst einen Anhang.
Abbildung 9 E-Mail Benachrichtigung Scan
Abbildung 9.1 QPilot Scan holen
Abholen von Scans
Scans können aus folgenden Netzen abgerufen werden:
Computerraum der HFT
HFTwlan
HFTwifi
VPN
Vorgehensweise:
1. Verbinden Sie sich mit https://qpilot.hft-stuttgart.de
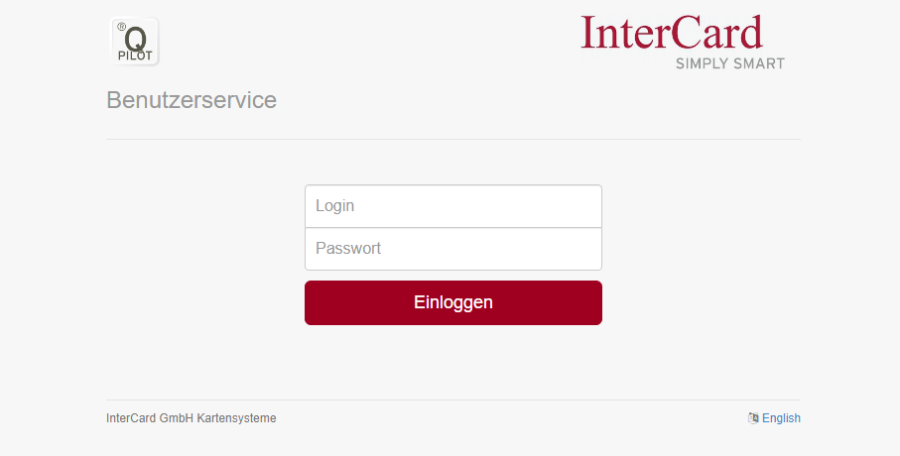
Abbildung 10 QPilot Login
2. Login: Ihre user-ID an der HFT
Passwort: Ihr Moodle-PW
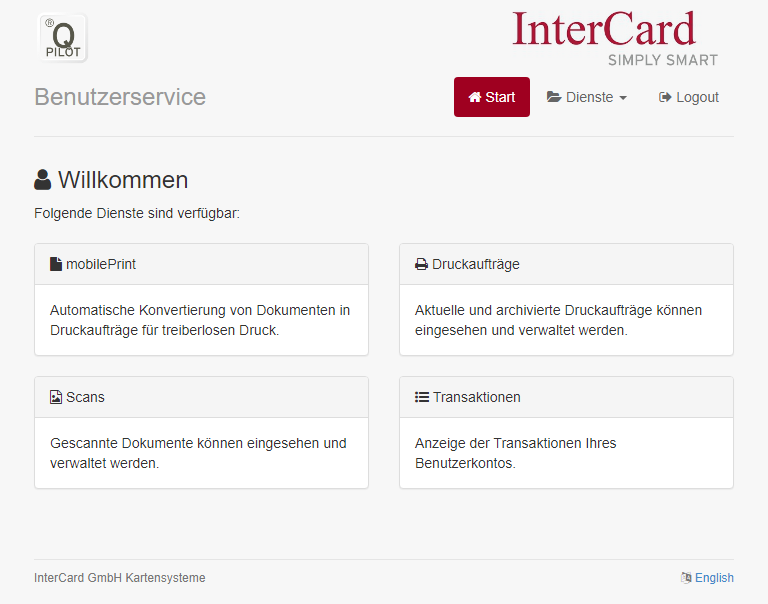
3. Klicken Sie auf „Scans"
Abbildung 11 QPilot Basisseite
Auswählen des Scans, der gespeichert werden soll
4. Download des Scans
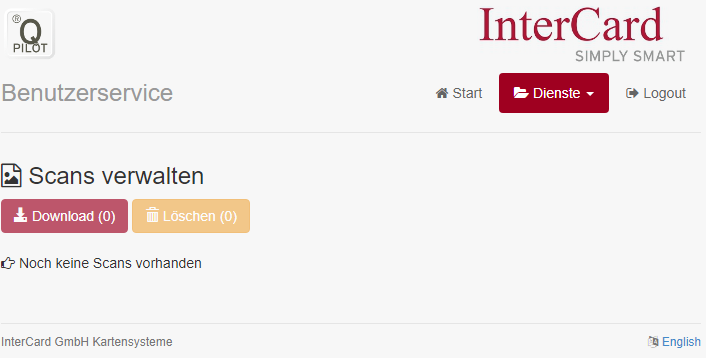
Abbildung 12 Scans verwalten
Scannen auf Speichergerät
Vorgehensweise:
1. Speichergerät (USB oder externe Festplatte) mit dem Kopierer verbinden (seitlich am Touchscreen).
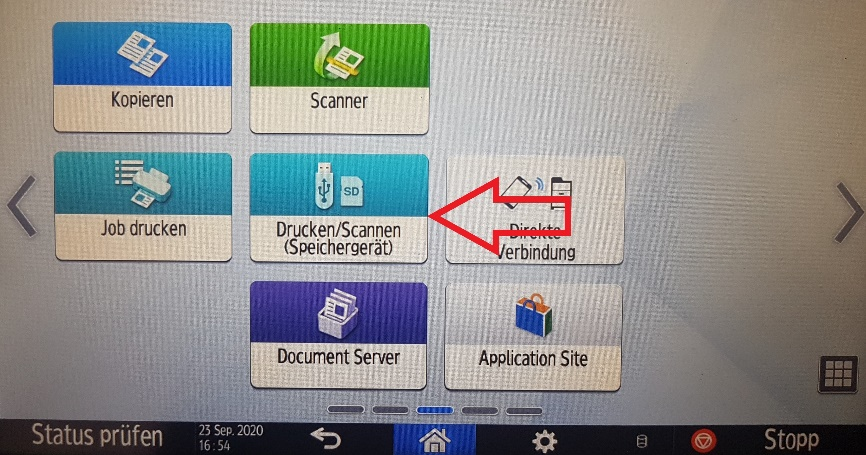
2. „Drucken/Scannen(Speichergerät)" auswählen
Abbildung 18 Touchscreen Start
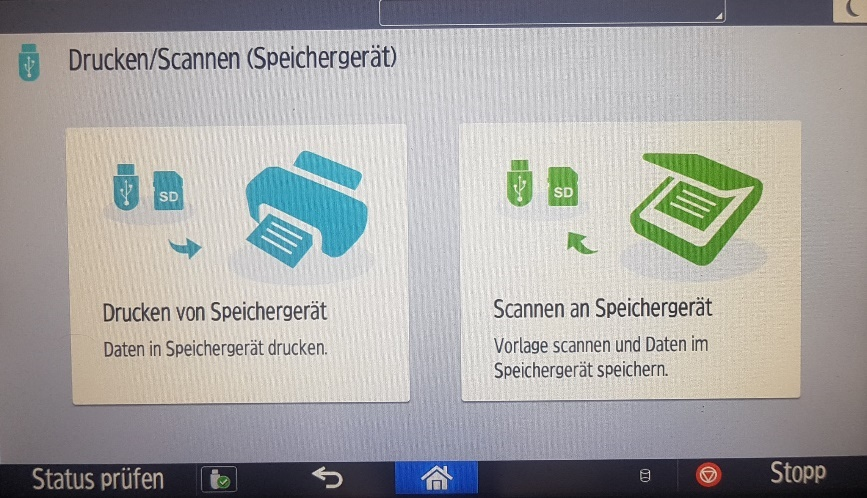
3. „Scannen an Speichergerät" auswählen
Abbildung 19 Touchscreen Speichergeräte
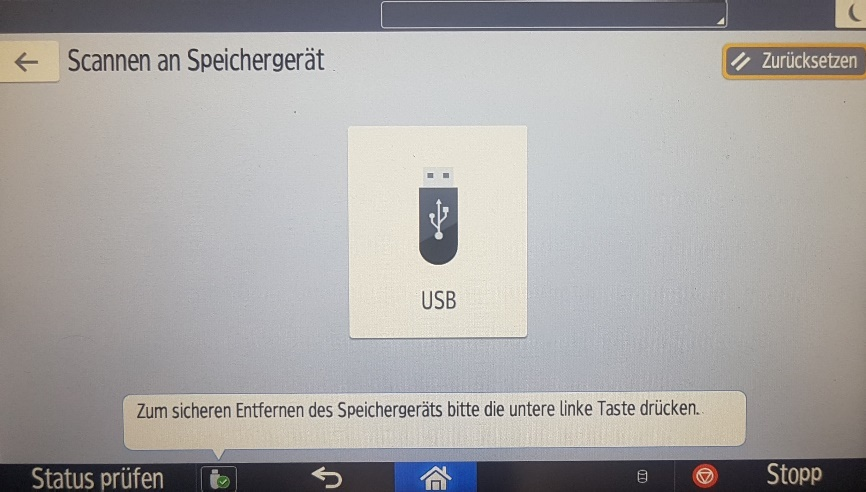
4. USBstick-Symbol (groß) anklicken
Abbildung 20 Auswahl Speichergerät
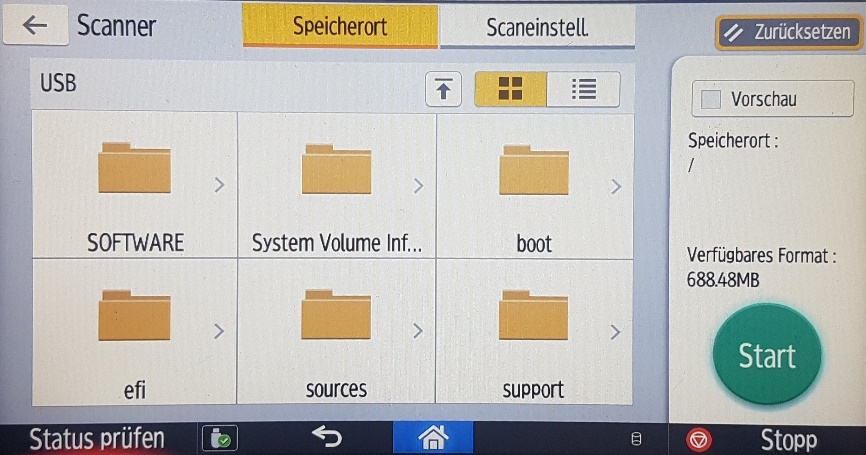
5. Speicherort auf dem USBstick auswählen
Abbildung 21 Auswahl Speicherort Speichergerät
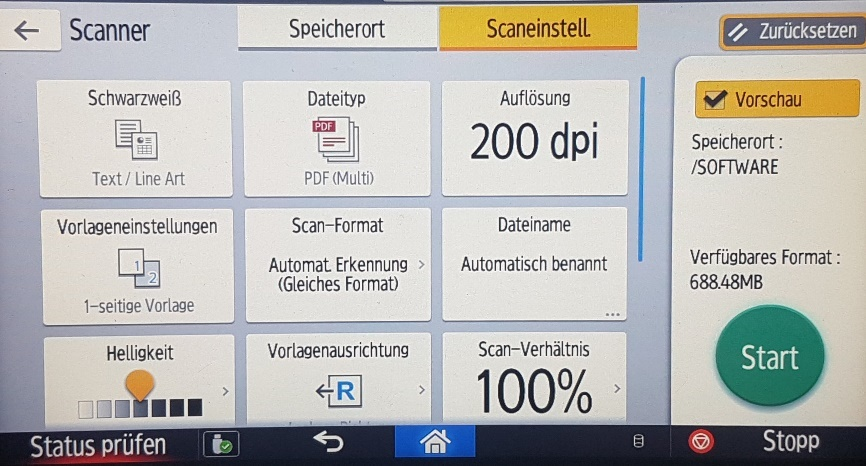
6. Optional können Scaneinstellungen vorgenommen werden
Abbildung 22 Scaneinstellungen
7. „Start" klicken um den Scan zu beginnen
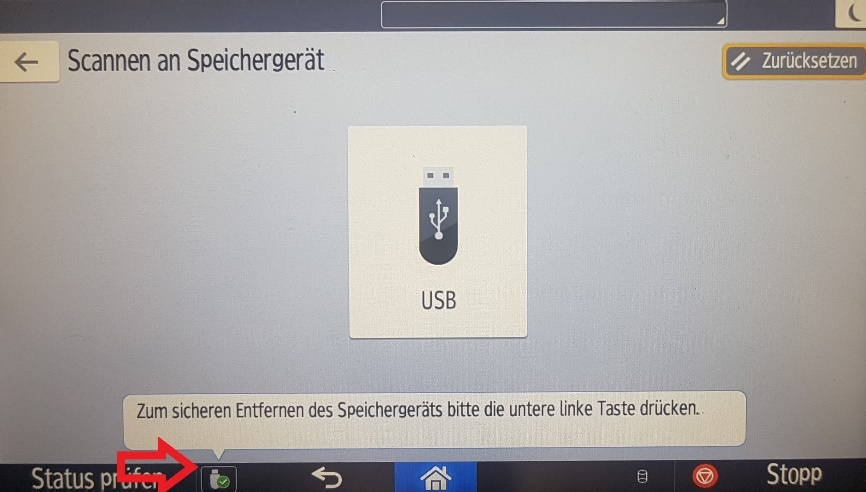
8. Speichergerät sicher entfernen durch klick auf das kleine USBstick-Symbol
Abbildung 23 Speichergerät auswerfen
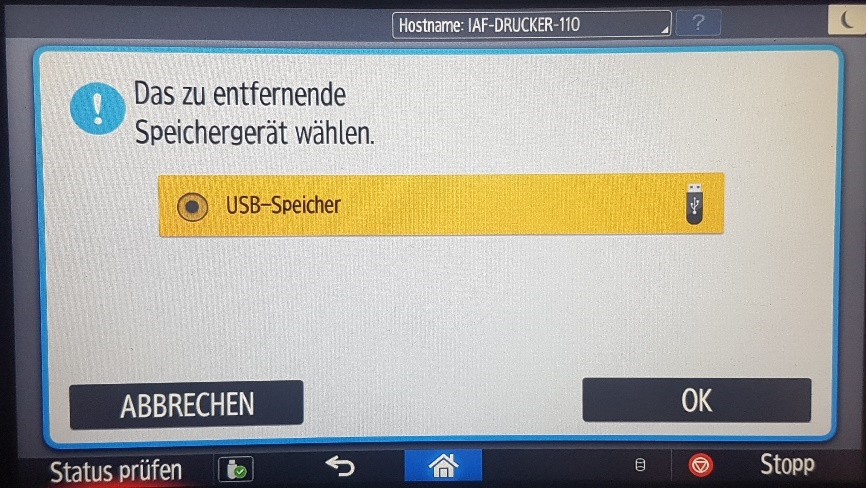
9. Speichergerät auswählen und mit „OK" bestätigen
Abbildung 24 Speichergerät auswerfen 2
10. Speichergerät vom Kopierer entfernen
Drucken von Speichergeräten
PDF Dokumente können von Speichergeräten gedruckt werden.
Vorgehensweise:
1. Speichergerät (USB oder externe Festplatte) mit dem Kopierer verbinden (seitlich am Touchscreen).
2. „Drucken/Scannen (Speichergerät)" auswählen
Abbildung 13 Touchscreen Start
3. „Drucken von Speichergerät" wählen
Abbildung 14 Touchscreen Speichergeräte
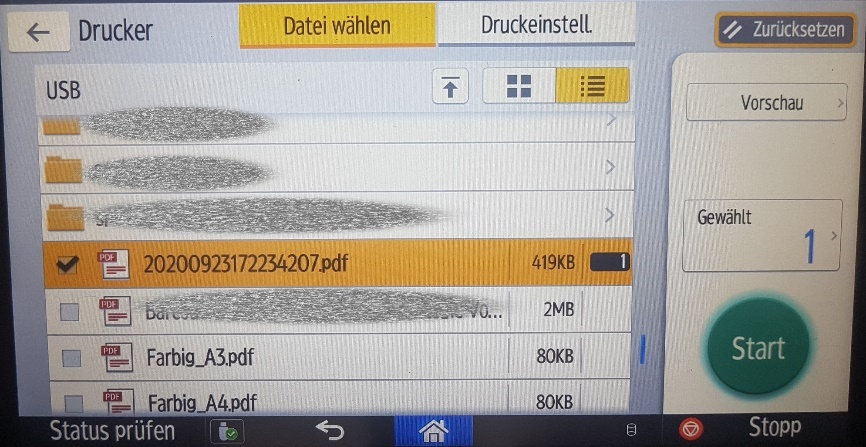
4. Datei auf dem Speichergerät auswählen
Abbildung 15 Dateiauswahl Speichergeräte
5. „Druckeinstellungen" auf Wunsch vornehmen
6. „Start" wählen
7. Ausdruck erfolgt
8. Speichergerät sicher entfernen durch klick auf das kleine USBstick-Symbol
Abbildung 16 Speichergerät auswerfen
9. Speichergerät auswählen und mit „OK" bestätigen
Abbildung 17 Speichergerät auswerfen 2
10. Speichergerät vom Kopierer entfernen
Mobiles Drucken
Druckauftrag hochladen
Mobiles Drucken ist aus folgenden Netzen möglich:
HFTwlan
HFTwifi
VPN
Vorgehensweise:
1. Erstellen Sie die zu druckende Datei so, wie Sie gedruckt werden soll (farbige Druckvorlagen werden farbig gedruckt und können nicht nachträglich als Schwarz/Weiß-Druck ausgegeben werden)
2. Verbinden Sie sich mit https://qpilot.hft-stuttgart.de
Abbildung 25 QPilot Login
Login: Ihre user-ID an der HFT
Passwort: Ihr Moodle-PW
Abbildung 26 QPilot Basisseite
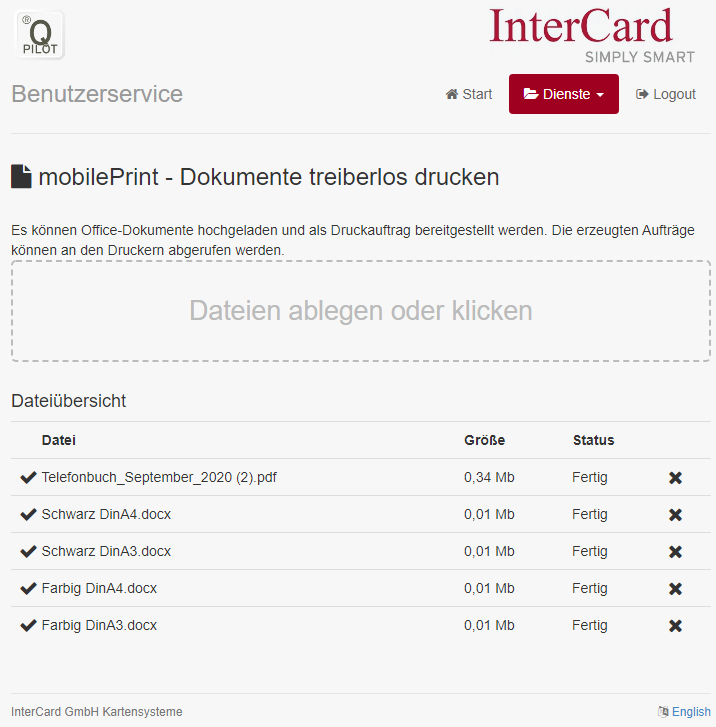
3. mobilePrint
Abbildung 27 QPilot mobilePrint
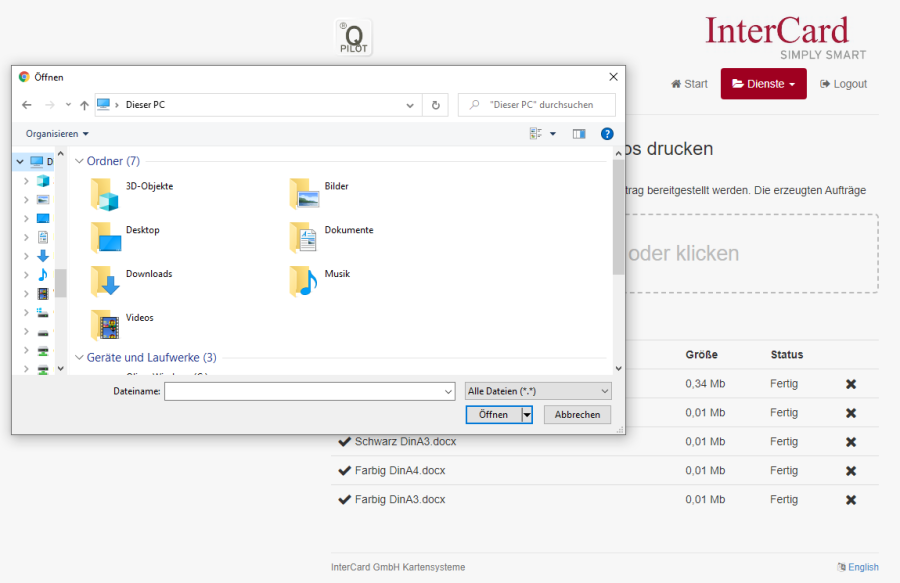
4. Druckauftrag durch reinziehen oder klicken und auswählen, hochladen
Abbildung 28 QPilot mobilePrint Datei hochladen
5. Zurück zu Abbildung QPilot Basisseite
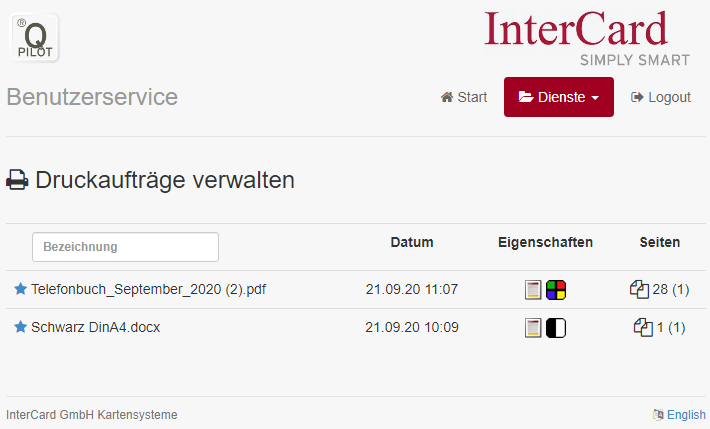
6. Druckaufträge wählen
Abbildung 29 QPilot Druckaufträge
Übersicht der Druckaufträge druckbare Aufträge sind mit einem blau gefüllten Stern markiert bereits gedruckte Aufträge sind mit einem nicht gefüllten Stern markiert
Bereits gedruckte Aufträge können, mit einem Klick auf den Stern neu aktiviert werden (Stern ist dann wieder blau gefüllt)
Datum
Zeigt an, wann der Druckauftrag aufgegeben wurde
Eigenschaften
Art der bereitgestellten Datei und ob farbig oder schwarz/weiß
Seiten
Anzahl der zu druckenden Seiten (Anzahl der zu druckenden Exemplare).
Mobilen Druck abholen
Vorgehensweise:
1. Hochschulausweis (mit Guthaben) in den Terminal einführen
Abbildung 30 Kartenterminal
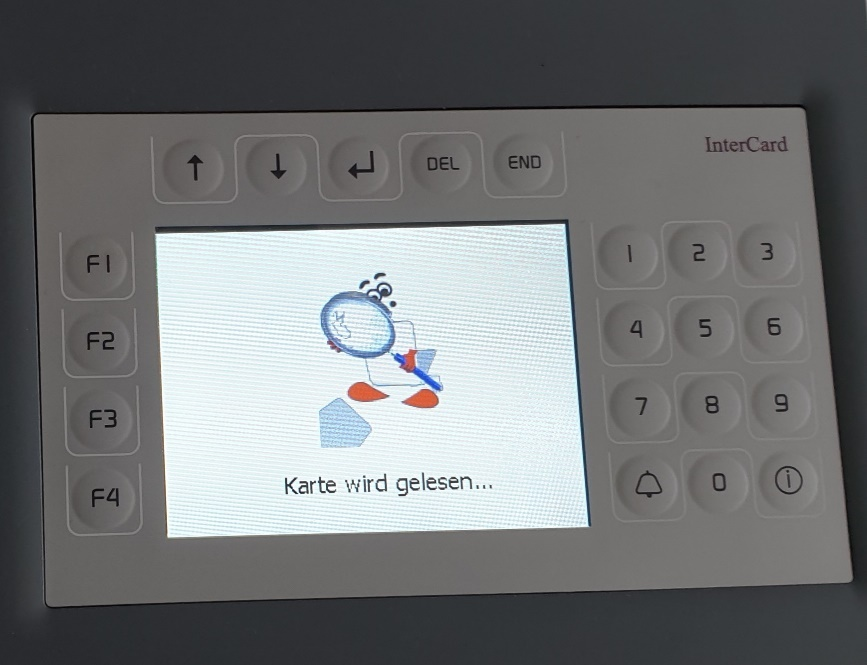
2. Karte wird gelesen
Abbildung 31 Terminal Karte lesen
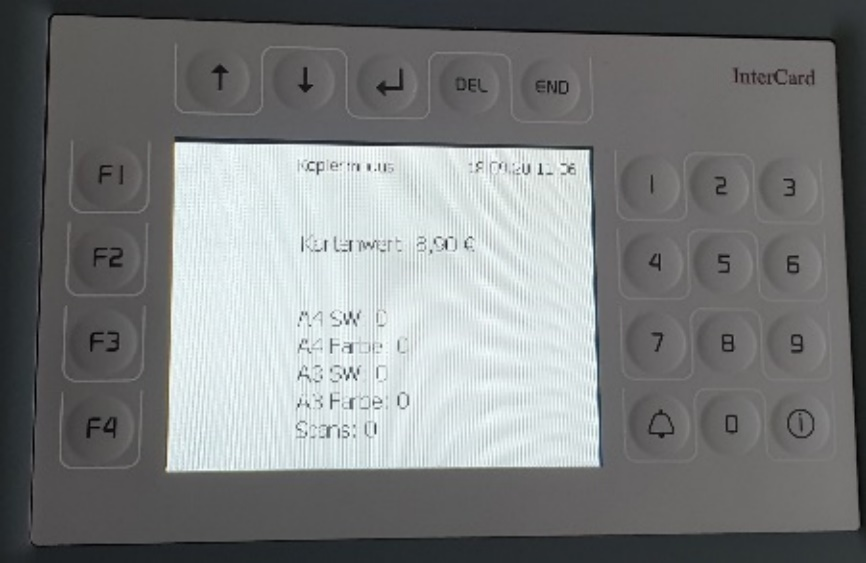
3. Kartenwert wird angezeigt
Abbildung 32 Terminal Kartenwert
4. F3: Vorgang „Drucken" auswählen
Abbildung 33 Terminal Auswahl Vorgang
5. Auswahl des Druckjobs
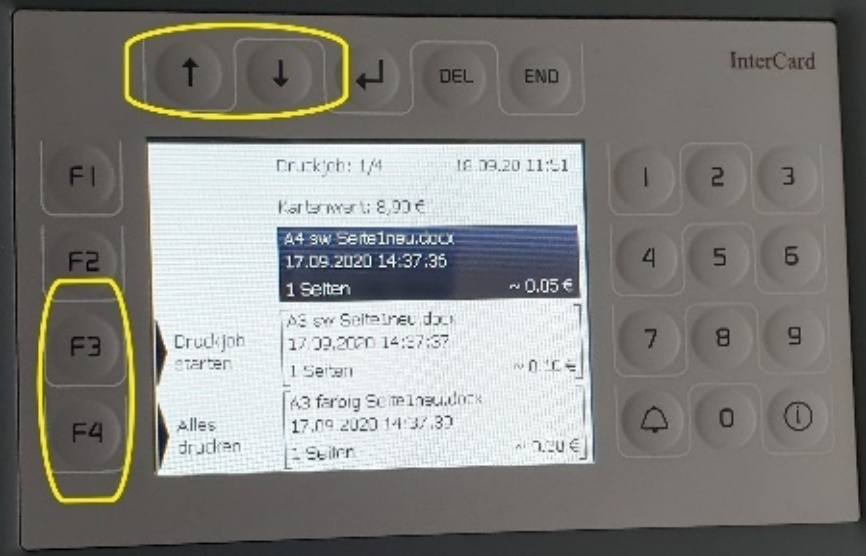
Einzelne Druckjobs können mit den "Pfeil unten"-, "Pfeil oben"- Tasten ausgewählt werden
F3: ausgewählter Druck wird gestartet
F4: alle Aufträge werden gestartet
Abbildung 34 Terminal Druckjob wählen
6. Ausdruck erfolgt
7. Hochschulausweis mit „End" auswerfen lassen
Scheme Pull-Printing
You send scans and print jobs to the QPilot-server, where they are kept ready for 5 days.
During this time, print jobs can be picked up on all connected copier devices (see below).
After that they will be deleted automatically.
For printing and scanning You need your student ID with credit.
For copying you need a minimum credit of 0.60 €.
Price list printing and copying
| Format | one-sided or duplex | color or black / white | Price in € |
|---|---|---|---|
DinA4 | one-sided | black/white | 0.05 |
| DinA4 | duplex per page | black/white | 0.05 |
| DinA4 | one-sided | colored | 0.30 |
| DinA4 | duplex per page | colored | 0.30 |
| DinA3 | one-sided | black/white | 0.10 |
| DinA3 | duplex per page | black/white | 0.10 |
| DinA3 | one-sided | colored | 0.60 |
| DinA3 | duplex per page | colored | 0.60 |
Table 1 Print the QPilot price list
For credit refund, please contact the Info Point (Student Services) in the cafeteria.
Info
Scanning is for free. But must still deposit of at least € 0.60 exist on your student ID card.
Locations of copiers
| Room | Copier name | ID card reader | |
|---|---|---|---|
| 1 | 4-010 | 101 | 1 |
| 2 | 1-008 | 102 | 3 |
| 3 | 1-008 | 103 | 2 |
| 4 | 2-021 | 201 | 9 |
| 5 | Building 2 Library Ground Floor | 211 | 5 |
| 6 | 3-124 | 311 | 11 |
| 7 | 3-124 | 332 | 12 |
| 8 | Building 5 0.87 | 501 | 6 |
| 9 | Building 8 242 | 10 | |
| 10 | LS 154.1A | LS 1 | 4 |
Table 2 QPilot Locations of copiers
Send print jobs in the computer labs
Students of the HFT can send from the computers in the computer labs print jobs to the copier over the Qpilot server and retrieve them at the copier within 5 days.
To do this, you need credit on your student ID. This function is not available to teachers or employees. Printer selection:
- For black/white printouts: select the printer QPilot_sw at qpilot01.ad.hft-stuttgart.de.
- For colored printouts: select the printer QPilot_farbe at qpilot01.ad.hft-stuttgart.de.
Take under additional settings (print settings) in the "General" settings as your document should be printed at the end. (Eg layout. 2 pages per sheet, 2-sided, staple) You can also up to staple 5 sheets of paper without staples (diagonally above, left, without staples, diagonally above, right, without staples), as a configuration on the touchscreen of the copier is not possible later. The position of a possible hole is defined under the "Finishing" tab.
Illustration 1 printer settings_1
Illustration 2 printer settings_2
How to Scan
Scan-to-Email
Method:
1. Place the original to be scanned on the scanner glass or in the multi-bypass
2. Insert university ID (with credit) into the terminal
Illustration 3 Terminal Home
3. Select F2: Copy & Scan & USB Print
Illustration 4 Terminal Select_Copy_Scan_Druck
4. Click on "Scanner" on the copier's touchscreen
Illustration 5 Touchscreen Home
5. Select "Scan to Mail" and click "Start"
Illustration 6 Touchscreen Scan_2_Mail_1
Illustration 7 Touchscreen Scan_2_Mail_2
7. Click "Start"
(Under "Send settings" you still have the option to choose different scan options)
Illustration 8 Touchscreen Scan_2_Mail_3
8. The scan is now performed and sent by e-mail.
If the scan is larger than 10 MB, the mail contains a download link, otherwise an attachment.
Illustration 9 Email notification scan
Illustration 9.1 collect QPilot Scan
Collection of scans
Scans can be accessed from the following networks:
- Computerlabs of the HFT
- HFTwlan
- HFTwifi
- VPN
Method:
1. connect with the https://qpilot.hft-stuttgart.de
Illustration 10 QPilot Login
2. Login: your user-ID at the HFT
Password: your Moodle-password
3. click on "scans"
Illustration 11 QPilot Basicsite
Selecting the scan to be stored
4. Download the Scan
Illustration 12 manage scans
Scanning to a memory device
Method:
1. connect a memory device (USB or external harddrive) with the Printer (on the side of the touchscreen).
2. 2. Select "Print / Scan (Storage Device)"
Illustration18 Touchscreen Start
3. Select "Scan to Storage Device"
Illustration 19 Touchscreen storage devices
4. Click on the USB stick symbol (large)
Illustration 20 selection memory device
5. Select the storage location on the USB stick
Illustration 21 Selection of storage location storage device
6. Optionally, scan settings can be made
Illustration 22 Scan Settings
7. Click "Start" to begin the scan
8. Safely remove the storage device by clicking on the small USB stick symbol
Illustration 23 Ejecting memory device
Illustration 24 Ejecting memory device 2
10. Remove the storage device from the copier
Print from memory devices
PDF documents can be printed from storage devices.
Method:
1. Connect the storage device (USB or external hard drive) to the copier (on the side of the touchscreen).
2. Select "Print/Scan (storage device)"
Illustration 13 Touchscreen Start
3. Select "Print from Storage Device"
Illustration 14 Touchscreen storage devices
4. Select the file on the storage device
Illustration15 File selection storage devices
5. Make "print settings" if desired
6. Select "Start"
7. Printing done
8. Safely remove the storage device by clicking on the small USB stick symbol
Illustration 16 Ejecting memory device
9. Select the memory and press "OK" to confirm
Illustration 17 ejecting memory device 2
10. remove storage device from the copier
Mobile printing
Upload print job
Mobile printing is possible from the following networks:
- HFTwlan
- HFTwifi
- VPN
Method:
1.Create the file to be printed as it should be printed (colored print templates are printed in color and cannot be subsequently output as a black and white print)
2. Connect with the https://qpilot.hft-stuttgart.de
Illustration 25 QPilot Login
Login: your user-ID at the HFT
Passwod: your Moodle-Password
Illustration 26 QPilot Basicsite
3. mobilePrint
Illustration 27 QPilot mobilePrint
4. Upload the Printjob with drag and drop or select and click
Illustration 28 QPilot mobilePrint upload files
5. Back to illustration QPilot Basicsite
6. Select Print jobs
Illustration 29 QPilot Print jobs
Overview of print jobs Printable jobs are marked with a blue star. Jobs that have already been printed are marked with an empty star
Jobs that have already been printed can be reactivated by clicking on the star (the star is then filled in blue again)
Datum (Date)
Indicates when the print job was submitted
Eigenschaften (Properties)
Type of file provided and whether in color or black and white
Seiten (Sites)
Number of pages to be printed (number of copies to be printed).
Collect mobile prints
Method:
1. Insert university ID (with credit) into the terminal
Illustration 30 card terminal
2. Card ist getting read
Illustration 31 terminal card reading
3. 3. Card value is displayed
Illustration 32 terminal card value
4. Press "F3" to select "Print"
Illustration 33 terminal selection process
Selection of the print job
- Individual print jobs can be selected with the "arrow down" and "arrow up" buttons
- F3: selected Print is getting started
- F4: all print jobs are getting started
Illustration 34 terminal select print job
6. Printout takes place
7. eject university ID card with "End"
